Levels of Customization
The Builder offers five levels of customization for your device management app.
You can deploy the Ioto Device Manager as-is to create your app. However, it's more common to progressively customize the Ioto Device Manager to suit your specific device management needs. This allows you to make swift progress when prototyping your IoT solution but still achieve the your ultimate goal of a fully bespoke app solution.
The Builder supports multiple device managers for a single device product. For example, you can create a mass-market device manager for most users, a "professional" version for premium customers, and a developer device manager app for your support staff.
The six levels of customization for the device manager are:
| Level | Name | Description |
|---|---|---|
| 1 | Standard | Use the Ioto Device Manager without modifications, ideal for development prototyping and in-house data-centric devices. |
| 2 | Styled | Style your app by adding your product name, logo and device data schema. Suitable for small-run data-centric device solutions. |
| 3 | Customized | Everything in "Styled" and customizing the app UI pages using the "no-code" Dashboard Designer and Display configuration file. |
| 4 | Rebuilt | Rebuild the Ioto Device Manager code to add your own UI components and logic. Suitable if you have custom requirements for specific user interfaces. |
| 5 | Replaced | Completely replace the Ioto Device Manager with your own custom application that uses the Ioto cloud service APIs. Suitable if you have unique custom requirements or must use a particular UI language or framework. |
Standard Device Manager
You can use the unmodified Ioto Device Manager as your device management app to immediately start your project and connect and manage your device.
The Ioto Device Manager is a versatile app designed to provide essential authentication, routing, data management, and visualization services for mobile and desktop management applications.
Using the unmodified Ioto Device Manager is ideal for developers to quickly prototype IoT solutions and for skilled end-users of small projects with data-centric devices, such as scientific applications.
The Ioto Device Manager includes the following features:
- User authentication, login, and access control
- Application structure with navigation bars, data display panels, dashboards, widgets, and data editing forms
- User navigation and request routing
- Dashboards and data/graphical widgets with dynamic live updating
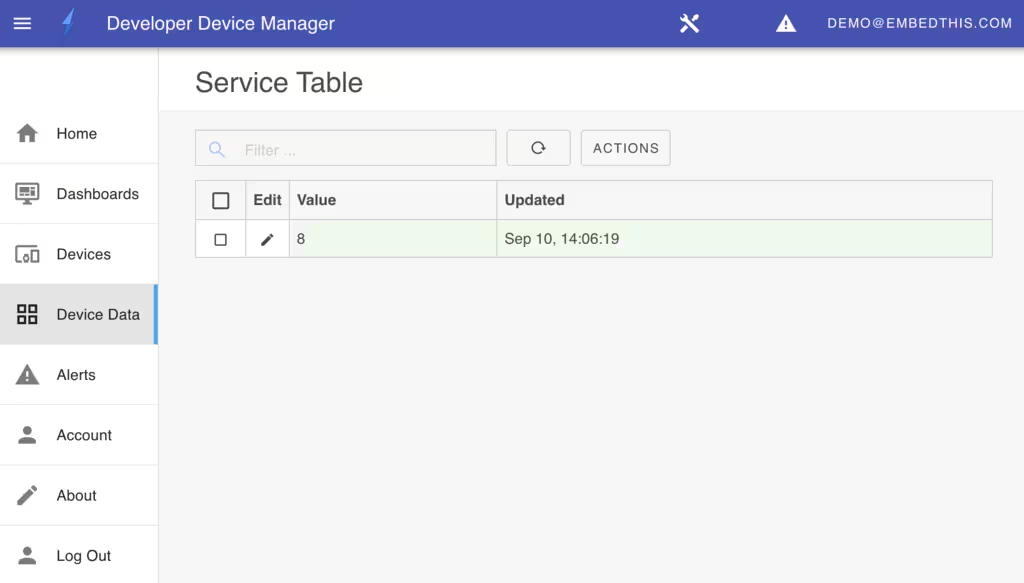
- Data property editor for viewing and modifying device data
- Device claim, release, and management for one or more devices
- Capability to connect to local HTTP device agents or cloud services
- Setup and configuration of VueJS and Vuetify frameworks
Using the Ioto Device Manager as a foundation can save you countless months of development time in creating a device management solution.
If you require custom UI screens tailored for your devices, you will want to customize the Ioto Device Manager using the techniques expained in Manager Package.
Styled Device Manager
A Styled device manager leverages the Ioto Device Manager and customizes the:
- App Name
- App Logo
- App theme stylesheet
- App display page definition
- Device Data Schema
App List
The Builder is used to create and configure device Apps. When you create or modify an app, you can define the app title, logo, theme style sheets or the display definition file.
From the Builder app list, click on the Add App button or the Edit icon to modify an app.

This will display the App configuration panel.

You can create one or more device managers for each device cloud.
Manager Domain Name
Apps on a hosted device cloud are on a sub-domain of your choosing under the ioto.me domain. You can select a unique sub-domain that reflects your company or product's brand. The sub-domain name you choose must be globally unique.
If your app is hosted on a dedicated device cloud, you can register a domain name and point that to the underlying Ioto manager site. To use a self-hosted domain, check the "Self Hosted Domain" checkbox and enter your full domain name.
Manager Version
You can select a specific manager version to be hosted for your devices. We highly recommend that you select a specific version so you can control when to upgrade to a new code version. However, you can specify latest to select the most recent Device Manager code base or beta to get a pre-release version.
Manager Title
The App Title can be modified to display an alternate name in the user interface navigation frame at the top of the browser window and on the login screen. Set this to your desired product name.
Custom Logo
Your app may be customized by uploading your own corporate or product logo. This logo will be used on the login panel and in the top navigation bar of the app.
Your logo should be a small, square, transparent logo in a format supported by most browsers.
To upload, click on the Logo section and and check the Upload Logo and click on the Logo Image file selection box to select a logo file to upload.
Device Data Schema
The device data schema describes the device entities and their data properties and data types. From this, your App is able to dynamically construct and tailor the user interface.
The default schema supports a generic key/value store. Initially, you can use the default schema, but as you progress, you will certainly want to define your own data entities to store device specific data.
The schema is configured via the Builder cloud list. Click on Clouds and then click on your device cloud to modify. This will display the Cloud Modify configuration panel.
Click on Device Data Schema and upload your device schema.
For more information about the device schema, See:
Customized Device Manager
A customized app adds one or more dashboard pages to a Styled App and incorporate cloud-side automated actions that react to user and device input.
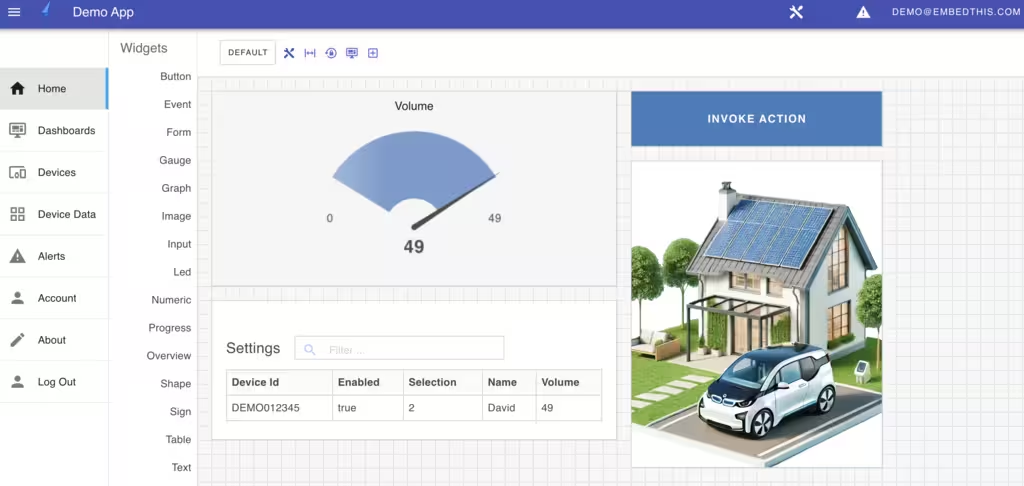
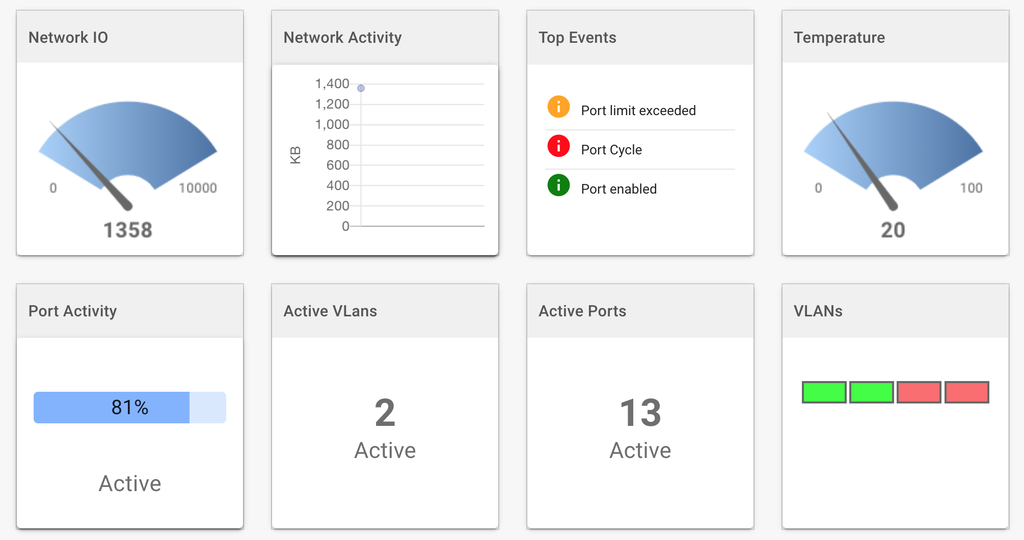
Dashboards can display device information using graphical widgets and can support user interactions to manage and control devices. By arranging input and output widgets in dashboard, you can create composite pages that are highly usable, interfaces for your devices.
Cloud-side actions can respond to user and device inputs to implement automated actions such as updating the database, implementing device actions and commands and notifying users.

Dashboards
Your app can create one or more dashboard pages to focus on different aspects of device operation and performance. For example, you may want a dashboard page that features service load graphs and metrics and another to focus on outages and errors. You can easily switch between dashboard pages by selecting the name of the dashboard from the dashboard list or by creating a button widgets that when clicked, jumps to a new page.
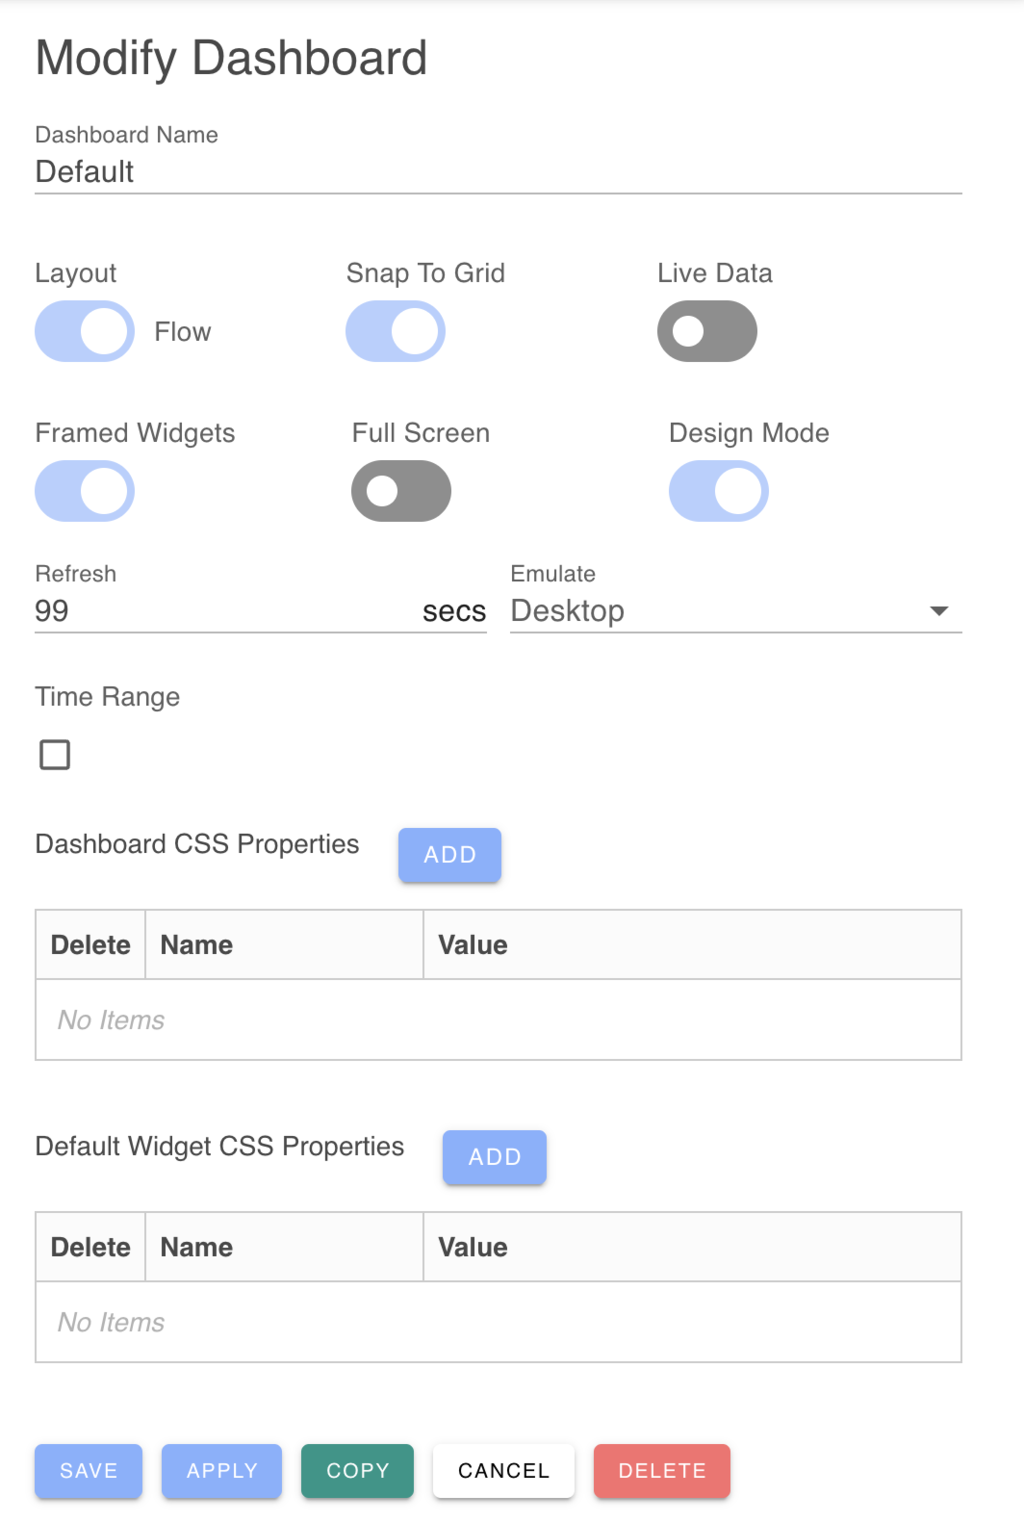
For each dashboard, you can define dashboard properties and a set of widgets. Dashboards can be styled with CSS properties including a background color or image, such as a map.
Dashboard Features
Dashboard pages offer the following:
- Graphical widgets including: graphs, gauges, numeric, text, button, image and user input widgets.
- Input widgets: checkbox, combobox, select list, date picker, file input, slider, switch, text, textarea and radio.
- Customizable dashboard layout and widget positioning sizing.
- Responsive design for varying screen sizes.
- Ability to style individual widgets and widget fields with any CSS properties.
- Ability to create multiple dashboards focussing on different service aspects.
- Ability to connect widgets to device metrics or device data.
Creating and Modifying Dashboards
You can create dashboards by clicking the Add button from the Dashboards list. To modify a dashboard, click on the dashboard row to display the Dashboard property panel.
You can control the Dashboard control the style and operation of the dashboard by defining properties for dashboard layout, widget presentation, styling including spacing, colors and backgrounds and more.
Dashboard Layout
Dashboards have the choice of using one of two layout engines:
- Grid layout engine will position widgets aligned on a grid so that no widgets overlap.
- Exact layout engine will position widgets exactly where you place them. Widgets can overlap and cover widgets behind them. The exact layout does not use a grid.
The Grid layout is often easier to align and position widgets. The Exact layout can work best if you need widgets to be very close and perhaps overlapping to create a seamless, composite UI page.
Dashboard Presentation
You can adjust the presentation of the dashboard modifing three presentation factors:
- Display the dashboard full screen without (vs with) an application navigation bar.
- Display the dashboard in design mode with a dashboard toolbar.
- Display dashboard widgets with frames around their border.
When designing a dashboard, it is easiest to work in non-full screen, design mode and with framed widgets. This makes it easier to position and resize widgets.
When you are finished designing the dashboard, you may wish to switch to Full-screen, not Design Mode and not Frameed Widgets.
Widgets
Dashboards supports a suite of widget types including: gauges, graphs, numeric, text, buttons, images, events, data tables and input widgets.
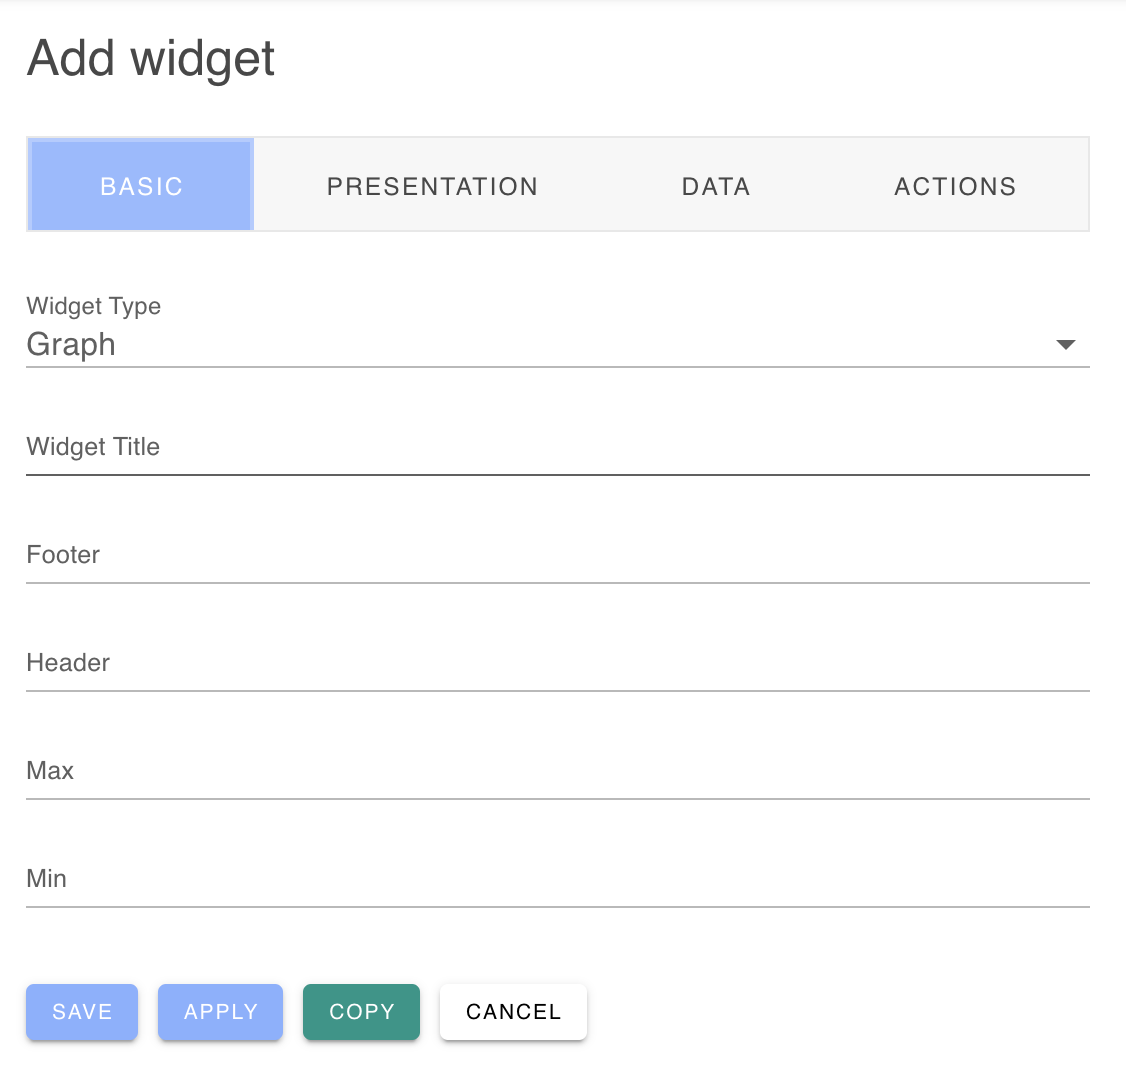
To add widgets to the dashboard, drag the desired widget from the widget toolbox or click on the plus (Add Widget) icon in the dashboard toolbar which will display the add widget slide-out panel.
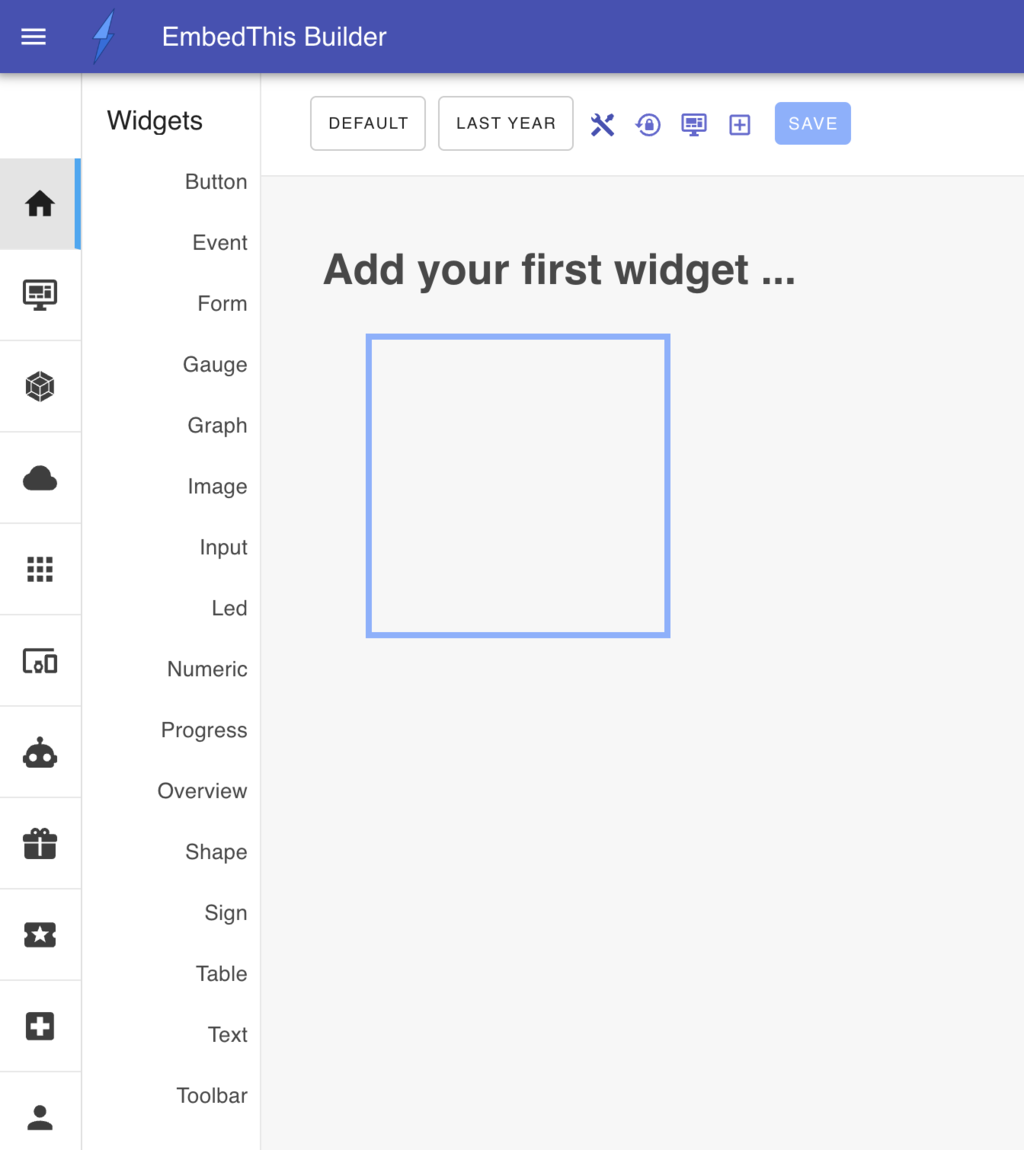
From this panel, you can define your widget type, style, data source and associated actions.
Responsive Design
When widgets are positioned, the width of the widget and its relative position to the left side of the browser are saved as a percentage of the browser window size. Thereafter, if the window is resized, or if the app is viewed on a different sized mobile device, the widget will be scaled according to the size of the UI display.
Rebuilt Device Manager
The Ioto Device Manager is capable of handling most device management display and modification tasks. However, you may have specific device management needs that require custom UI components and code. To meet this need, you can extend or replace the device manager with a bespoke UI of your own.
The Ioto agent download includes the full source code for the Ioto Device Manager app. You can customize, modify, extend and upload this manager app to the Builder for hosting to manage your devices.
Copying the Manager
The Ioto agent distribution include the Manager app under the ./apps/manager directory. In its pristine state, the manager app is used by EmbedThis to build the default "Device Manager" provided via the Builder. However, you can copy the manager app and then modify to suit your needs.
To get started, copy the entire apps/manager directory to a new directory:
Rebuilding Your Manager
To rebuild your manager, select your app via the make command line.
The build will create:
- Your manager application
- The Ioto agent with required services
The built application will be located under the apps/mymanager/ui/dist directory and will contain the individual application files and a app.zip ZIP file that is ready for uploading via the Builder to the Builder for hosting the UI.
Deploying Your App
To deploy your app, login to the Builder site to create and configure an app. Then, from the Builder manager list, click on the Add App" icon or the Edit** icon to modify an existing app.
Select the Custom App option and upload your app.zip archive and click Save.
The Builder will then deploy the image to the associated Ioto device cloud, which will take a few minutes.
See the Manager App in the Ioto Agent documentation for full details.
Replaced Device Manager
The Ioto Device Manager is an ideal basis for creating device management applications. It provides the necessary components for a secure, performant and usable device management applications. However, you may have a need to create your own bespoke manager using the Ioto cloud service APIs to access device data and state.
For details about the Ioto Cloud service APIs, please read:
Requirements
When creating your device manager app, there are two requirements:
- The application must be packaged as a ZIP file
- The ZIP file must have a top level index.html
Deploying
Once your app is built, package as a zip file and login to the Builder site to create and configure an App. Then, from the Builder app list, click on the Add App" icon or the Edit icon to modify an existing app. Select the Custom App option and upload your app.zip archive and click Save**.
The Builder will then deploy the image to the associated Ioto device cloud, which will take a few minutes.
Read more about the Ioto APIs: